


(File Formulation: Crafting Your Own 3D Printer Files from Start to Finish)
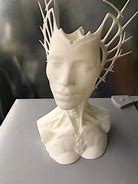
Envision holding a tiny dragon porcelain figurine, a custom phone case, or perhaps a substitute gear for your broken coffee maker-- all birthed from your imagination and crafted by your very own hands. This isn't magic (though it feels like it); it's the power of creating your own 3D printer files. Allow's study just how you can transform wild ideas right into tangible things, one digital plan at a time. First, the spark: concepts. Every 3D-printed item starts as a flicker in your mind-- a "what happens if?" minute. Maybe you require a quirky shelf brace shaped like an arm, or a personalized chess piece with your pet cat's face. Whatever it is, your trip starts right here. Yet concepts are slippery. Get hold of a notebook, sketch wildly, or scribble on a paper napkin. The messier, the better-- creative thinking thrives in mayhem. Next off, software becomes your play ground. Programs like Tinkercad (beginner-friendly) or Blender or food processor (for the take on) are your digital sculpting devices. Think about Tinkercad as LEGO for grownups: drag, drop, and fuse shapes right into your vision. Mixer, at the same time, is like a lightsaber-- powerful however calling for practice. Begin straightforward. A cube ends up being a box; a cyndrical tube morphs right into a flower holder. Slowly, you'll find out to warp, spin, and boolean your way to complexity. Pro suggestion: Welcome the reverse button. Mistakes are simply happy mishaps waiting to be upgraded. Currently, allow's talk polygons. When creating, your model is a mesh of tiny triangles. Also few, and your dragon resembles a potato. A lot of, and your documents comes to be a digital hippo-- sluggish and uncontrollable. Striking equilibrium is key. Usage devices to enhance geometry without giving up detail. Think about it as offering your model a health club day: scrub unneeded vertices, moisturize with smooth contours. But wait-- what happens if your masterpiece floats in midair like a supernatural UFO? That's where the "check for mistakes" phase saves the day. Software application like Netfabb or Meshmixer serves as your design's physician, detecting openings, upside down normals, or non-manifold edges (fancy talk for "this won't print"). Fixing these problems is like untangling earphone wires: frustrating however deeply pleasing when resolved. Export time! Your production ends up being an STL data-- an universal language for 3D printers. But printers are divas. They need exact instructions. Get in slicing software application: Cura, PrusaSlicer, or Simplify3D. Below, you'll fine-tune layer elevation (assume pancake thickness), infill density (just how hollow your print is), and support structures (scaffolding for overhangs). It's part science, part art. Too much support, and your print resembles it's caught in a spiderweb. Insufficient, and your bridge breaks down like a poor punchline. Ultimately, the moment of truth: hitting "print." As the maker hums to life, you'll oscillate between exhilaration and dread. Will it function? Or will you obtain a pastas monster rather than a vase? In either case, you learn. Failed prints are deep space's method of saying, "Attempt once more, but cooler."
(File Formulation: Crafting Your Own 3D Printer Files from Start to Finish)
Developing 3D printer documents isn't simply technological-- it's storytelling. Each layer is a sentence; each model, a phase in your maker journey. So order your electronic wand, accept the experimentation, and remember: every expert was as soon as a beginner looking at a tangled mess of polygons. Your following print might be a calamity, a work of art, or both. And that's the appeal of being a 3D hero. Currently go forth-- your kingdom of plastic marvels awaits!


